Answer MEP Question 16
Q. Write short notes on the following:
(A). Magnetic Particle Inspection (MPI)
(B). Ultrasonic Testing (UT)
(C). Radiographic Testing (RT)
1. Magnetic particle test:-
They are conducted on ferromagnetic materials and can detect surface and subsurface defects. These are used on ferrous components to detect the presence of any subsurface cracks. The material to be checked is magnetized and sprayed with a special powder. This collects on the location of the crack and highlights the area.
a. Finely divided ferromagnetic particles, applied over the surface.
b. The magnetic field is applied to the material under test.
c. The discontinuities in the surface or sub-surface will cause a leakage field, the particles will be gathered and held by the leakage field.
d. The collection of particles forms an outline of the discontinuity and indicates its location, size, shape, and extent.
Advantages:
Large surface areas of complex parts can be inspected rapidly.
Can detect surface and sub-surface flaws.
Surface preparation is less critical than it is in the penetrant inspection.
Magnetic particle indications are produced directly on the surface of the part and form an image of the discontinuity.
Equipment costs are relatively low.
Disadvantages:
Only the ferromagnetic material can be inspected.
Proper alignment of magnetic field and defect is critical.
large currents are needed for very large parts.
Requires a relatively smooth surface.
Paint or other non-magnetic coverings adversely affect sensitivity.
Demagnetization and post-cleaning are necessary.
2. Ultrasonic test:-
Ultrasonic short pulse waves of frequency 0.1-15MHz are used. This uses high-frequency waves, which are transmitted through the material to be tested, and the reflections are analyzed to find any flaws or to ascertain the thickness of the material.
a. Test can detect the flaws in the components, also used to determine the thickness of the plate.
b. A transducer is connected to a diagnostic machine is passed over the object being inspected.
c. The transducer sends pulse waves through the surface of the object and receives the sound reflected back to the device.
d. Reflected ultrasound comes from an interface such as the back wall of the object or from an imperfection.
e. The CRT screen on the calibrated diagnostic machine displays these results in the form of a signal with an amplitude representing the intensity of the reflection and the distance taken for the reflection to the transducer.
f. In the CRT it can be seen that the sound wave is reflected from the bottom and from the fault, by which the location of the fault can be detected.
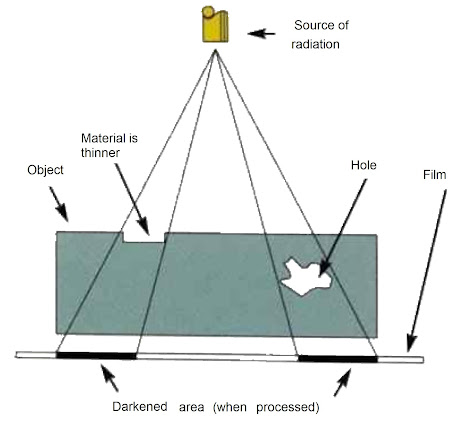
3. Radiographic test:- A short-wavelength electromagnetic radiation (High energy photons) is used to detect hidden flaws in the material. Welding, forging, and castings are inspected by this method. This is used to check welds in pressure vessels, either on the whole weld or in certain critical areas. The rays are directed onto special radiographic film, which is then developed to expose any possible defects in the work.
a. An X-Ray machine or a radioactive source like Iridium-192 or Cobalt-60 is used as a source of photons.
b. The radiation penetrates through the test object and falls on the photographic film.
c. The Intensity of radiation emerging from the test object varies depending on the flow.
d. This can be seen in the negative, the dark areas are signs of defects.


Comments
Post a Comment